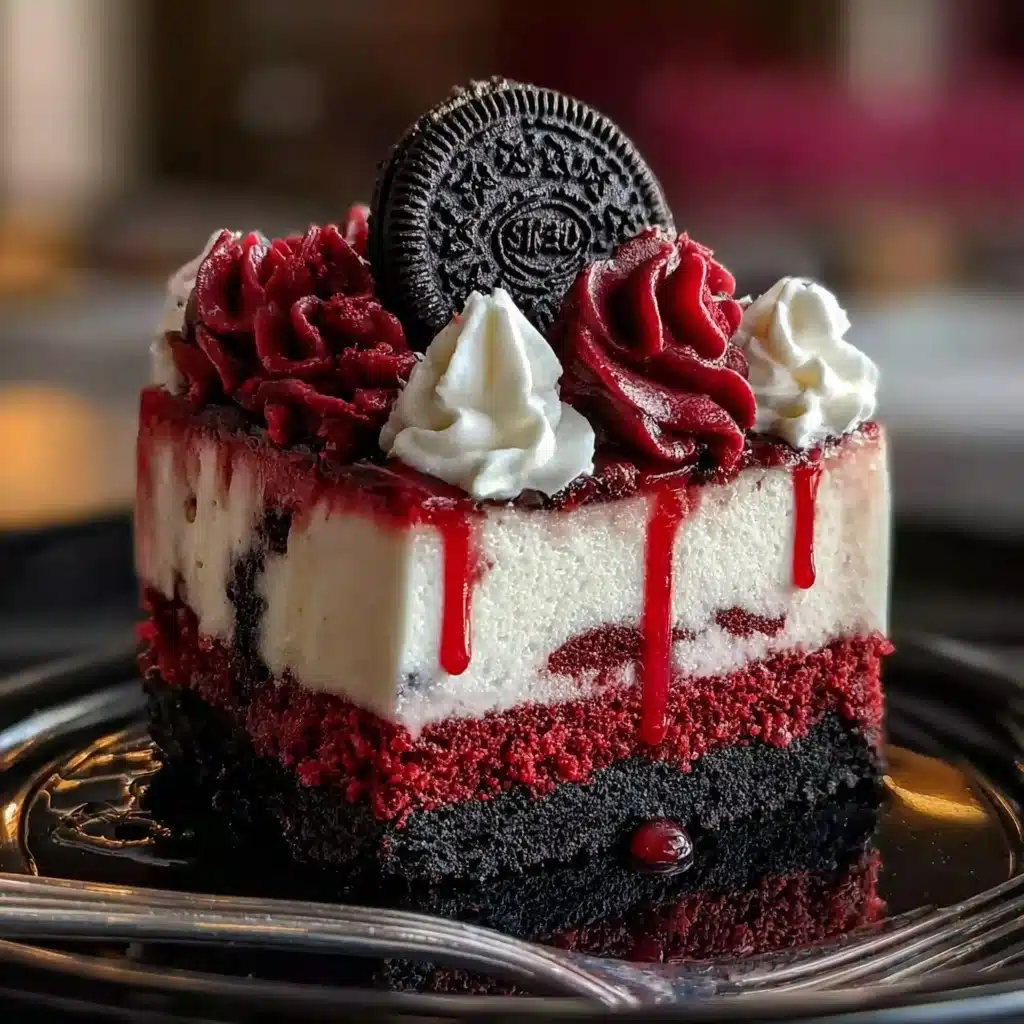
Red Velvet Oreo Cheesecake Recipe
There is something truly irresistible about a dessert that combines classic flavors with a playful twist, and that’s exactly what this Red Velvet Oreo Cheesecake delivers. Imagine the lush creaminess of cheesecake layered atop a vibrant, tender red velvet cake, all studded with chunks of crunchy, chocolatey Oreos. The Red Velvet Oreo Cheesecake is not only a feast for your taste buds but also a stunning centerpiece that brings both color and indulgence to any occasion. Trust me, once you take that first bite, you’ll be hooked on this melt-in-your-mouth combination of textures and flavors.
Ingredients You’ll Need
Gathering the right ingredients is the secret to nailing the perfect Red Velvet Oreo Cheesecake. Each component plays a crucial role in delivering the dessert’s signature velvety texture, rich flavor, and iconic red hue. Plus, these ingredients are simple, easy to find, and come together harmoniously to make the magic happen.
- 1 ½ cups all-purpose flour: This is the sturdy foundation that gives the red velvet cake its perfect crumb.
- 1 cup granulated sugar: Sweetness that balances the cocoa and smooths out the tanginess.
- 1 tablespoon cocoa powder: Delivers a subtle chocolate note that’s essential for classic red velvet flavor.
- ½ teaspoon baking powder: Helps the cake rise beautifully and stay soft.
- ¼ teaspoon baking soda: Works with vinegar to boost the color and tender texture.
- 1 teaspoon vanilla extract: Elevates all the flavors with a warm, comforting aroma.
- 1 large egg: Binds everything together and adds structure to the cake layer.
- ½ cup buttermilk: Adds moisture and that signature tanginess that makes red velvet cake so special.
- ¼ cup vegetable oil: Brings richness and keeps the cake moist and tender.
- 1 tablespoon white vinegar: Reacts with the baking soda, enhancing both color and texture.
- 1 ounce red food coloring: The vital ingredient that gives red velvet cake its bold, eye-catching color.
- Oreos (amount to your preference): For that delightful crunch and deep chocolate flavor mixed throughout the cheesecake.
- Cream cheese: The star of the cheesecake layer, providing its creamy, smooth texture.
- Sugar for the cheesecake: Balances the tanginess of the cream cheese.
- Eggs for the cheesecake: Essential for setting and a smooth finish.
- Vanilla extract for the cheesecake: Adds depth and a lovely aroma.
How to Make Red Velvet Oreo Cheesecake
Step 1: Prepare the Red Velvet Cake Layer
Start by mixing your dry ingredients: flour, sugar, cocoa powder, baking powder, and baking soda. In a separate bowl, whisk together the wet ingredients carefully – buttermilk, oil, egg, vanilla, white vinegar, and the vibrant red food coloring. Combine the wet and dry ingredients until they form a silky batter. Pour this into a greased springform pan and bake until it springs back to the touch and a toothpick comes out clean. This luscious red velvet base sets the stage for your cheesecake layer.
Step 2: Make the Oreo-Studded Cheesecake Filling
While your cake cools, whip together the cream cheese until smooth, then gradually add sugar, eggs, and vanilla. The goal here is a silky, lump-free batter that will bake into a delightful cheesecake. Chop Oreos into chunky pieces—these add incredible texture and bursts of chocolate flavor. Gently fold the Oreos into the batter, making sure they’re evenly distributed without breaking down.
Step 3: Assemble and Bake the Cheesecake
Once the red velvet cake layer has cooled slightly but is still in the pan, gently pour the cheesecake filling over it. Smooth the top with a spatula to create an even layer. Bake the combined dessert slowly, allowing the cheesecake to set without cracking. Timing here is key—low and slow yields the creamiest, most gorgeous cheesecake finish.
Step 4: Cool and Chill Thoroughly
After baking, it’s absolutely crucial to let the Red Velvet Oreo Cheesecake cool at room temperature before transferring it to the fridge. Chilling overnight is best because it lets all the flavors marry and the cheesecake firm up to the perfect cutting consistency. This step ensures every slice holds together beautifully, bursting with creamy, chocolatey, and smooth red velvet goodness.
How to Serve Red Velvet Oreo Cheesecake

Garnishes
Serving this Red Velvet Oreo Cheesecake with a little flair makes it even more special. Fresh berries like raspberries or strawberries add a refreshing tang and a pop of color that contrast the richness. A dusting of powdered sugar or a drizzle of chocolate ganache turns each slice into an elegant indulgence. Crushed Oreo crumbs sprinkled on top bring a lovely textural finish and tie the entire flavor profile together.
Side Dishes
This decadent dessert pairs beautifully with simple sides that won’t overpower it. A scoop of vanilla ice cream or whipped cream lightens each bite, while a cup of freshly brewed coffee or a rich espresso cuts through the sweetness, making every forkful a perfectly balanced indulgence.
Creative Ways to Present
If you’re feeling adventurous, serve the Red Velvet Oreo Cheesecake in individual glass jars or mini springform pans for a stunning presentation. Layer with extra crushed Oreos or swirl some cream cheese frosting on top for added visual drama. These creative serving ideas are perfect for parties or any occasion where you want to impress your guests.
Make Ahead and Storage
Storing Leftovers
Keep your Red Velvet Oreo Cheesecake covered tightly in the refrigerator. Properly stored, it stays fresh and creamy for up to five days. This makes it an excellent make-ahead dessert when planning celebrations or just when you want a delicious treat to enjoy throughout the week.
Freezing
Freezing is a great option if you want to prep ahead. Wrap the cheesecake securely with plastic wrap and aluminum foil to prevent freezer burn. It will keep well for up to three months. To enjoy later, thaw it overnight in the fridge for best texture and flavor.
Reheating
This cheesecake is best eaten chilled, so reheating is generally not recommended. However, if you prefer your dessert slightly warmer, allow slices to rest at room temperature for 15-20 minutes before serving to soften slightly without losing that creamy texture.
FAQs
Can I use a different type of cookie instead of Oreos?
Absolutely! While Oreos give a classic chocolate crunch that pairs wonderfully with red velvet, feel free to experiment with other cookies like chocolate chip cookies or even Biscoff for an interesting twist.
Do I need a special pan to make this cheesecake?
Using a springform pan is highly recommended because it allows you to easily remove the cake without damaging the delicate layers.
Is it possible to make this recipe gluten-free?
Yes, by substituting the all-purpose flour with a gluten-free flour blend and ensuring your Oreos are gluten-free, you can adapt this dessert for gluten-free diets.
Why does the red velvet cake layer need vinegar?
The vinegar reacts with baking soda to help the cake rise while also enhancing the red color and contributing to the unique tangy flavor that defines red velvet cake.
Can I make the cheesecake layer dairy-free?
With the right substitutions like dairy-free cream cheese and non-dairy milk, you can absolutely create a dairy-free version that still tastes rich and creamy.
Final Thoughts
There’s nothing quite like the joy of baking and sharing a show-stopping dessert like the Red Velvet Oreo Cheesecake. Perfect for celebrations or when you want to treat yourself, this recipe delivers layers of flavor and texture that delight every sense. Give it a try, and I promise it will become one of your favorite go-to indulgences that friends and family will keep asking for again and again!
PrintRed Velvet Oreo Cheesecake Recipe

This Red Velvet Oreo Cheesecake combines the classic rich, creamy texture of cheesecake with the delightful flavors of red velvet cake and crunchy Oreo cookies, creating a luscious dessert perfect for special occasions or indulgent treats.
- Prep Time: 25 minutes
- Cook Time: 70 minutes
- Total Time: 5 hours 35 minutes
- Yield: 12 servings 1x
- Category: Dessert
- Method: Baking
- Cuisine: American
- Diet: Vegetarian
Ingredients
Red Velvet Cake Layer
- 1 ½ cups all-purpose flour
- 1 cup granulated sugar
- 1 tablespoon cocoa powder
- ½ teaspoon baking powder
- ¼ teaspoon baking soda
- 1 teaspoon vanilla extract
- 1 large egg
- ½ cup buttermilk
- ¼ cup vegetable oil
- 1 tablespoon white vinegar
- 1 ounce red food coloring
Cheesecake Layer
- 16 ounces cream cheese, softened
- ¾ cup granulated sugar
- 2 large eggs
- 1 teaspoon vanilla extract
- ½ cup sour cream
- 15 Oreo cookies, crushed
Oreo Crust
- 20 Oreo cookies, finely crushed
- 5 tablespoons unsalted butter, melted
Instructions
- Prepare the Oreo Crust: Combine finely crushed Oreo cookies with melted butter until the mixture resembles wet sand. Press evenly into the bottom of a 9-inch springform pan to form the crust. Refrigerate while preparing the cake layers.
- Make the Red Velvet Cake Batter: In a medium bowl, sift together flour, cocoa powder, baking powder, and baking soda. In a separate large bowl, beat egg, sugar, vegetable oil, buttermilk, vanilla extract, and red food coloring until smooth. Gradually add the dry ingredients into the wet, mixing until just combined. Stir in the white vinegar carefully.
- Prepare the Cheesecake Filling: Beat softened cream cheese with sugar until fluffy and smooth, then add eggs one at a time. Stir in vanilla extract and sour cream until fully combined. Fold in crushed Oreo cookies gently to maintain chunks.
- Assemble the Layers: Pour half of the red velvet cake batter over the Oreo crust and spread evenly. Next, gently pour the Oreo cheesecake filling over the cake layer, smoothing the top. Finally, carefully spoon the remaining red velvet cake batter over the cheesecake layer, trying to cover the filling as evenly as possible.
- Bake the Cheesecake: Preheat the oven to 325°F (163°C). Bake the assembled cake for 60 to 70 minutes, or until the edges are set and the center slightly jiggles when nudged. Turn off the oven and leave the cheesecake inside with the door slightly ajar for 1 hour to cool gradually and prevent cracking.
- Chill the Cheesecake: Remove the cheesecake from the oven and refrigerate for at least 4 hours, preferably overnight, until fully set and firm.
- Serve: Release the springform pan, slice the cheesecake with a sharp knife, and serve chilled. Optionally garnish with additional crushed Oreos or whipped cream.
Notes
- Ensure cream cheese is softened for a smooth cheesecake batter.
- Do not overmix the batter to keep the cake tender.
- Use full-fat cream cheese and sour cream for best texture.
- Red food coloring amount may vary depending on brand and desired color intensity.
- To avoid cracks, do not open the oven door during the initial baking period.
- If you don’t have buttermilk, use regular milk with 1 tablespoon vinegar as a substitute.
- The cheesecake is best refrigerated for at least 4 hours before serving.
Nutrition
- Serving Size: 1 slice (approx. 1/12 of the cake)
- Calories: 450
- Sugar: 36g
- Sodium: 210mg
- Fat: 28g
- Saturated Fat: 12g
- Unsaturated Fat: 14g
- Trans Fat: 0.5g
- Carbohydrates: 42g
- Fiber: 1g
- Protein: 7g
- Cholesterol: 85mg
Keywords: Red Velvet Cheesecake, Oreo Cheesecake, Red Velvet Cake, Oreo Dessert, Layered Cheesecake, Holiday Dessert, Cream Cheese Dessert