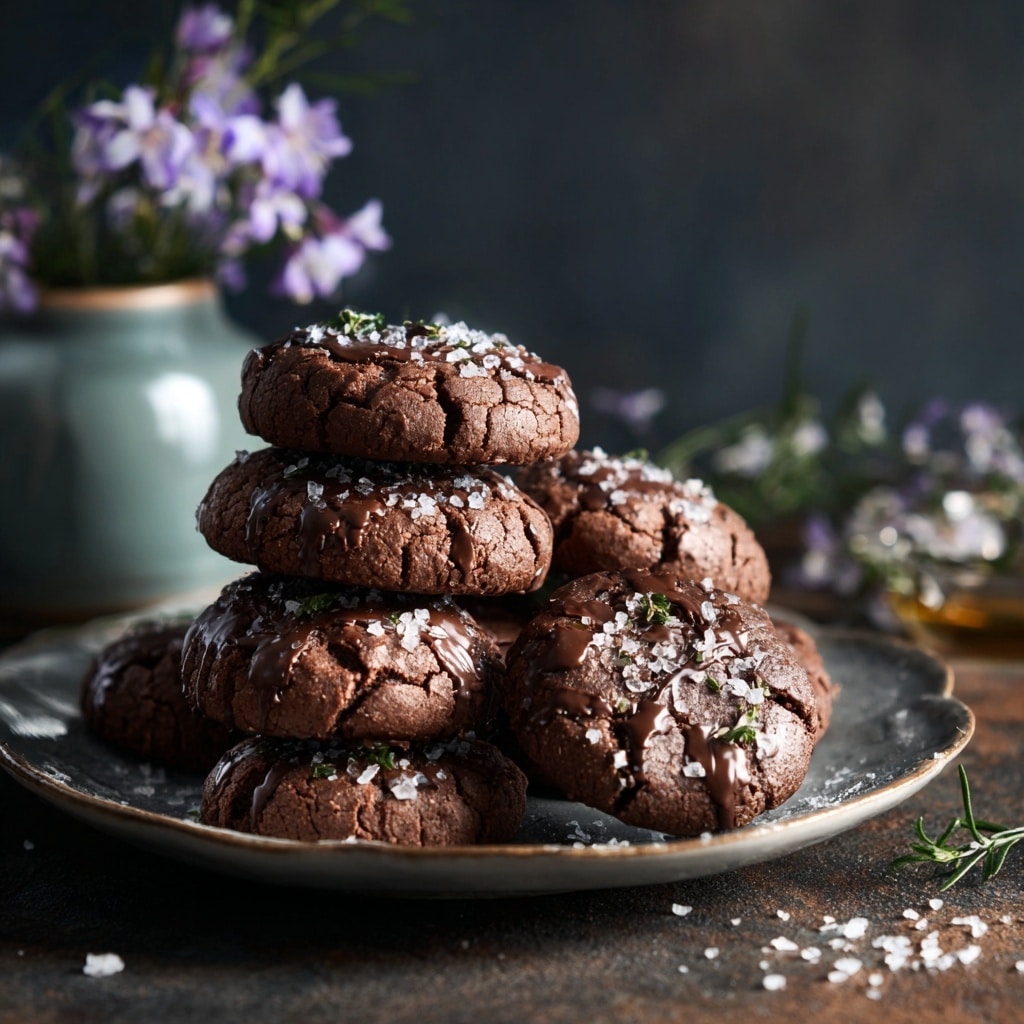
Chocolate Cut Out Cookies Recipe
Introduction
Chocolate Cut Out Cookies are rich, tender, and perfect for shaping into festive designs. Their deep cocoa flavor combined with a soft texture makes them ideal for decorating with your favorite frostings. Whether for a holiday or a special treat, these cookies are sure to impress.
Ingredients
- 2 cups (260g) all-purpose flour
- 3/4 cup (85g) natural unsweetened cocoa powder
- 1 tbsp (8g) cornstarch
- 1/2 tsp baking soda
- 1/4 tsp baking powder
- 1/2 tsp salt
- 1 cup (224g) unsalted butter, room temperature
- 1 1/4 cups (259g) granulated sugar
- 1 large egg
- 1 tsp vanilla extract
Instructions
- Step 1: In a medium bowl, whisk together the flour, cocoa powder, cornstarch, baking soda, baking powder, and salt. Set aside.
- Step 2: In a large mixing bowl, beat the butter and sugar on medium speed for 2-3 minutes until light and creamy in texture.
- Step 3: Add the egg and vanilla extract to the butter mixture and mix until fully combined.
- Step 4: Gradually add the dry ingredients to the wet ingredients, mixing just until the dough comes together. The dough will be thick and may look crumbly, but continue gently mixing with a spatula or your hands until a smooth ball forms. Avoid overmixing.
- Step 5: Refrigerate the dough for at least one hour, or up to three days. This helps the cookies become more tender and easier to handle.
- Step 6: Preheat your oven to 350°F (180°C) and line a baking sheet with a silicone mat or parchment paper.
- Step 7: Let the dough come back to room temperature briefly, then divide into two equal portions. Roll each portion between two sheets of parchment paper to about 1/4 inch thickness.
- Step 8: Place the rolled dough, still between the parchment sheets, on a cookie sheet and freeze for 5 minutes. Remove the top parchment, cut the dough into shapes immediately, and transfer the cut cookies to the baking sheet. For less spreading, chill the cut cookies again if desired.
- Step 9: Bake the cookies right away for 8-12 minutes, or until they look set and done.
- Step 10: Remove from the oven. If the cookies spread too much, gently press the edges back with a butter knife while they’re still warm to maintain the shape.
- Step 11: Let the cookies cool on the baking sheet for 3-5 minutes before transferring them to a wire rack to cool completely.
- Step 12: Repeat rolling, cutting, and baking with the remaining dough until all cookies are baked.
- Step 13: Once cooled, decorate the cookies with your choice of buttercream, easy sugar cookie icing, or royal icing as desired.
Tips & Variations
- For the best texture, chill the dough before rolling and cut cookies while the dough is cold to prevent spreading.
- Substitute half the butter with browned butter for a deeper, nutty flavor.
- Use parchment paper to make rolling and transferring the dough easier and less sticky.
- Decorate with royal icing for crisp, smooth details or buttercream for a creamy finish.
Storage
Store baked cookies in an airtight container at room temperature for up to 5 days. For longer storage, freeze the cooled cookies in a sealed container for up to 3 months. Thaw at room temperature before decorating or serving. If decorated with buttercream or royal icing, keep them in a cool, dry place.
How to Serve
Serve this delicious recipe with your favorite sides.
FAQs
Can I make the dough ahead of time?
Yes, the dough can be refrigerated for up to 3 days before baking, which can improve the texture and make it easier to roll out.
Why are my cookies spreading too much?
Cookies often spread if the dough is too warm during cutting or baking. Chilling the dough and baking cut cookies while still cold helps maintain their shape. Also, avoid using too much butter or sugar beyond the recipe amounts.
PrintChocolate Cut Out Cookies Recipe

These Chocolate Cut Out Cookies are tender, rich, and full of chocolate flavor, perfect for decorating with your favorite frostings or royal icing. Made with a blend of cocoa powder and classic baking ingredients, this dough is easy to roll out and cut into fun shapes, then baked to a perfect texture that holds its form well. Refrigerating the dough before baking helps the cookies maintain their shape and ensures a tender crumb.
- Prep Time: 20 minutes
- Cook Time: 8-12 minutes per batch
- Total Time: 1 hour 40 minutes (including chilling)
- Yield: About 24–30 cookies depending on size 1x
- Category: Dessert, Cookies
- Method: Baking
- Cuisine: American
Ingredients
Cookie Dough
- 2 cups (260g) all-purpose flour
- 3/4 cup (85g) natural unsweetened cocoa powder
- 1 tbsp (8g) cornstarch
- 1/2 tsp baking soda
- 1/4 tsp baking powder
- 1/2 tsp salt
- 1 cup (224g) unsalted butter, room temperature
- 1 1/4 cups (259g) granulated sugar
- 1 large egg
- 1 tsp vanilla extract
Optional Frostings
- Buttercream Frosting
- Easy Sugar Cookie Icing
- Royal Icing
Instructions
- Mix Dry Ingredients: In a medium-sized bowl, combine the all-purpose flour, cocoa powder, cornstarch, baking soda, baking powder, and salt. Set this mixture aside for later use.
- Cream Butter and Sugar: In a large mixing bowl, beat the room temperature unsalted butter with the granulated sugar on medium speed for 2-3 minutes. The mixture should become lighter in color and creamy in texture, indicating proper creaming.
- Add Wet Ingredients: Add the large egg and vanilla extract to the creamed butter and sugar. Mix until everything is well combined.
- Incorporate Dry Ingredients: Gradually add the dry ingredient mixture to the wet ingredients. Mix just until the dough comes together. The dough may initially look crumbly, but continue folding gently with a spatula or your hands until it forms a cohesive ball. Avoid over mixing.
- Refrigerate Dough: Cover the dough and refrigerate it for at least 1 hour, or up to 3 days. This step helps the cookies to bake more tenderly and hold their shape better.
- Preheat Oven and Prepare Baking Sheet: Preheat your oven to 350°F (180°C). Line a cookie sheet with a silicone baking mat for even baking and easy release.
- Roll Dough: Bring the chilled dough back to room temperature to make rolling easier. Divide the dough into two equal portions and roll each between two sheets of parchment paper to about 1/4 inch thickness.
- Freeze and Cut Shapes: Place the rolled dough with parchment on a cookie sheet and freeze for about 5 minutes. Remove from freezer, peel off the top parchment sheet, and quickly cut dough into desired shapes. Transfer cut cookies back onto the baking sheet. Optionally, chill again briefly to reduce spreading.
- Bake Cookies: Bake the cookies immediately while still cold for 8 to 12 minutes, or until done but not overbaked. The edges may be slightly firm while centers stay tender.
- Shape While Warm: Remove cookies from the oven and, if they have spread too much, gently press the edges inward using a butter knife or similar tool. Doing this while they are warm helps maintain the intended shape.
- Cool Cookies: Allow the cookies to cool on the baking sheet for 3-5 minutes before transferring them to a wire rack to cool completely.
- Repeat: Continue rolling, cutting, and baking until all the dough is used up.
- Decorate: Once fully cooled, decorate with your choice of buttercream, sugar cookie icing, or royal icing as desired.
Notes
- Refrigerating the dough is recommended for better shape and tenderness but not mandatory.
- Keeping the dough cold right before baking minimizes spreading.
- Cookies can be stored in an airtight container for up to one week.
- Use parchment or silicone mats to prevent sticking.
- Adjust baking time based on cookie size and thickness.
- For best results, roll dough evenly to maintain consistent bake time.
Keywords: chocolate cookies, cut out cookies, cocoa powder cookies, holiday cookies, decorated cookies